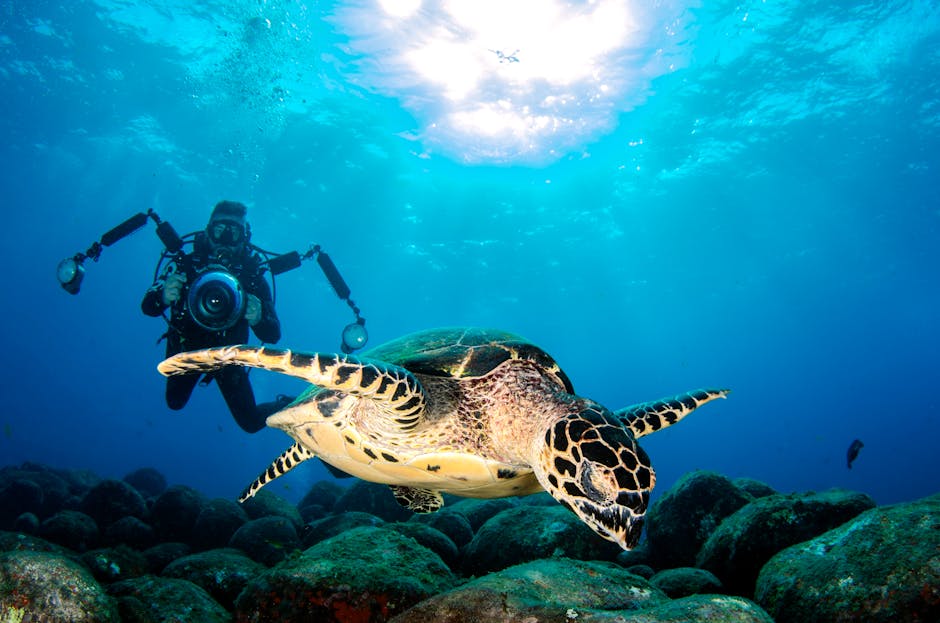
The photograph I am most proud of from fifteen years of reef snorkelling was taken with a waterproof point-and-shoot camera worth about two hundred dollars, in a lagoon I’d been told wasn’t particularly interesting, of a hawksbill turtle feeding on a sponge at approximately 1.5 metres depth.
What makes it a photograph I’m proud of has nothing to do with the equipment. The turtle had been grazing for several minutes by the time I approached it, and I had spent those minutes watching it from a distance, tracking the direction it was moving and the rhythm of its feeding. I positioned myself not where the turtle was but where it was going, settled at the surface, and let it come to me. When it arrived — moving slowly, absorbed in feeding, entirely undisturbed — I had framed, focused, and was waiting. The image has the quality of stillness that you only get when the animal doesn’t know you’re there.
That quality of stillness is not a camera function. It’s a behaviour function. And it’s available to anyone with any camera.
Starting Out: The Right Equipment for Your Experience Level
Smartphone in a waterproof case. This is the entry point and it’s more capable than it has any right to be. Modern smartphone cameras shoot in very good quality up to about a metre from the subject, and waterproof cases good to three to five metres — sufficient for most snorkelling depths — cost $20 to $60. The limitations: no zoom in the optical sense (digital zoom degrades quality rapidly), no strobes possible, limited low-light performance. For surface snorkelling in clear, shallow water, these limitations rarely matter.
Compact waterproof camera. The Olympus Tough and Sony RX0 series represent the established choice here. Dedicated waterproof cameras handle the water environment more naturally than phones in cases, allow better manual control, and in the higher-end models accept wet lens attachments (additional lenses that clip over the front of the housing to achieve wider or macro focal lengths). This is the sweet spot for serious snorkellers: the quality is considerably higher than a phone, the equipment is manageable, and the learning curve is reasonable.
Compact camera in a housing with optional strobes. This is where snorkel photography becomes technically demanding and produces results that match what scuba photographers achieve. A compact mirrorless system in a proper housing with small strobes — Inon, Sea&Sea, or Backscatter products — restores natural colour at depth, allows proper exposure of subjects against the bright water column background, and produces images with the quality of professional underwater photography. The cost is higher, the learning curve steeper, and the physical management of a housing and strobes requires practice.
The Three Biggest Technical Challenges
Blue cast. Water selectively absorbs red and orange wavelengths, meaning that images taken in natural light, even in shallow water, trend increasingly blue-green with depth. At three metres, reds are noticeably muted. At six metres, they’re largely absent. The solutions: use a red filter (a clip-on red lens that compensates for the absorbed wavelengths — effective in the 2 to 8 metre range where snorkelling mostly happens), shoot with a strobe (which adds full-spectrum white light to the subject), or correct in post-processing (works for stills but not for the colours of the live image you’re composing).
Backscatter. Tiny particles in the water — sediment, plankton, organic matter — scatter the light from your strobe toward the camera lens, appearing as small white specks scattered across the image. Backscatter is minimised by positioning strobes to the sides and slightly behind the camera lens, so the scattered light fires away from the lens rather than toward it, and by shooting in the clearest water available.
Focus in moving water. You are moving. The animal is (possibly) moving. The water is moving both of you. Continuous autofocus helps. A wide depth of field helps (smaller aperture, though this requires more light). Pre-focusing on a fixed object at the approximate distance of your target, then moving that object out of the frame and positioning your subject at the same distance, is an old technique that still works well for static or slow-moving animals.
Composition Underwater
The underwater photography rules that make the biggest difference to image quality, in order of importance:
Get close. The single most universal piece of underwater photography advice. Water reduces clarity, colour, and contrast with distance. An image of a fish taken from two metres is always worse than an image of the same fish from half a metre. Get as close as the subject allows. If the subject leaves when you get close, it wasn’t ready to be photographed yet.
Shoot from eye level. Images taken from directly above a subject — looking down at a turtle on the reef, for example — have a snapshot quality that lacks depth. Getting to the subject’s eye level, or below it, produces images with genuine perspective and the sense of being in the animal’s environment rather than observing from above.
Include context. A tight close-up of a parrotfish face is interesting. A slightly wider shot that shows the parrotfish against the coral it’s feeding on, with the beam of light from the surface above, tells a story. The context doesn’t have to be elaborate — a single background element that situates the subject in its environment is often enough.
Use natural light near the surface. The light quality in the top two metres of a clear tropical sea, with the sun high and the surface relatively calm, is extraordinary: shafts of refracted light, caustic patterns on the reef below, the blue gradient deepening with depth. Images that incorporate this surface light — particularly with a subject in the foreground and the light behind — have a quality that no amount of artificial lighting can produce. Shoot upward, into the light, whenever the composition allows it.
The Most Photogenic Subjects (And How to Find Them)
Sea turtles. Patient approach from the side or below. Let them continue feeding; don’t interrupt by diving directly above them. The best turtle photographs show the animal in its full context — coral below, light above — rather than a tight face shot.
Parrotfish and surgeonfish schools. These fish move continuously, but they move in patterns — they’re grazing systematically across the reef. Position yourself ahead of their direction of travel and let them come to you.
Nudibranchs. Very small, very slow. The technical challenge is depth of field: a nudibranch is three-dimensional, and with a macro lens only a thin slice of the animal will be in sharp focus. Choose which part of the animal matters most (usually the head, the gill plumes, or a distinctive colour feature) and focus on that.
Schools of fish against the light. Blue-water schools of batfish, fusiliers, or trevally, viewed from below with the surface light behind them, produce images that require almost no technique — they compose themselves. Position below the school, point upward, shoot.
The best underwater photographs I’ve seen from snorkellers were mostly taken by patient people in good conditions with modest equipment. The camera is almost never the limiting factor.
The limiting factor is almost always time: time spent in the water, time spent watching, time spent approaching correctly. Equipment rents or buys. Time is the one thing you actually have to invest.


